Monday, July 6, 2020

Evercade - Flashing Firmware on Linux

This article describes how to flash a new Evercade firmware using Linux.

Download Rockchip upgrad_tool

wget https://raw.githubusercontent.com/rockchip-linux/tools/master/linux/Linux_Upgrade_Tool/Linux_Upgrade_Tool/upgrade_tool
chmod 755 upgrade_tool

Download Evercade Firmware

wget http://evercade-support.co.uk/support/EVERCADE_FW_UPDATE.zip
unzip EVERCADE_FW_UPDATE.zip

Flash Evercade Firmware

In this example we will firmware 1.1a.
Connect the Evercade to USB, hold down the MENU button and turn on the console.
Now run the following command:

./upgrade_tool UF "EVERCADE_FW_UPDATE/EVERCADE FW FILE/EVERCADE FW 1.1a.img"

The output should look something like this:
Not found config.ini

Program Data in /tmp
Loading firmware...
Support Type:RK312A FW Ver:8.1.276 FW Time:2020-05-13 18:02:21
Loader ver:2.52 Loader Time:2020-05-13 18:01:00
Upgrade firmware ok.

After flashing, the Evercade will restart.

Friday, July 22, 2016

RM mini 3 Workaround

The RM mini 3 is an inexpensive BroadLink device. Unfortunately the RM mini 3 is not supported by the BroadLink API and thus not working with RM Bridge out of the box.
BroadLink RM mini 3

Nevertheless the new RM Bridge version 1.3.0 offers a workaround to get RM mini 3 devices working.

RM Bridge in its version 1.3.0 persists all found and manually registered devices. So it is possible to permanently register a RM mini 3 manually.
The RM mini 3 seems to support the same IR command set as the RM2 which makes it possible to register a RM mini 3 as RM2 devices.

The setup is simply done by using the RM Bridge web interface Code Learning page.
On that page there is a new entry to register a device manually.


Fill in a name, the MAC address of the RM mini 3, specify RM2 as type and press the Add Manually button.

After that the RM mini 3 should show of in the list of devices.


Now IR code learning should work the same way as with RM2 devices.

Saturday, December 19, 2015

Chatting with Binary Web Sockets

This is a follow up article to Chatting with Web Sockets.
Since version 0.97 beta, PAW Server supports binary Web Sockets. Before that only text base Web Sockets were supported.

Binary Web Sockets have the benefit (as the name implies) that binary Blobs (Binary Large Objects) can be exchanged. That offers the possibility to exchange binary data. This blog post shows how to use binary Web Sockets to build a simple (multi-) media chat client by using these new capabilities.

Bellow is a screenshot of the new chat window which also allows to drag and drop (media) files to send them to connected clients. There are two drop areas, the button titled Drop / Select and the message output area. In addition files can be selected by pressing the Drop / Select button.

Chat Window

Supported file types depend on the used browser, but normally audio, video, text and html files should work.

The setup is almost identical to the one described inside the former post Chatting with Web Sockets.
Only the ZIP file including HTML/CSS and JavaScript files are different. You'll find a link to the ZIP file below that post.

So to make sure Web Sockets are setup correctly follow the following steps from the post Chatting with Web Sockets:
  1. Configuring the Web Socket Handler
  2. Web Socket Config File
  3. The BeanShell Script
After the configuration is finished, the only thing left is to extract the ZIP file into a folder (e.g. chat2) of your choice inside the [PAW_HOME]/html folder (usually /sdcard/paw) and to call that page from a browser.

You can now try to connect to the web page (e.g. http://<ip>:8080/chat2/) with multiple browsers and see if the chat is working.

Have fun and merry Xmas :)

Links


Sunday, December 6, 2015

Extending Handlers with BeanShell

This post will show how to extend an existing handler by using BeanShell.
Since PAW 0.96 BeanShell can be used to write handlers (and filters). In earlier versions of PAW handlers and filters had to be provided as Java class file, so a Java development environment was needed. By the use of BeanShell handlers and filters can now be developed directly on an Android device. This is especially handy when developing handler and filters for testing.
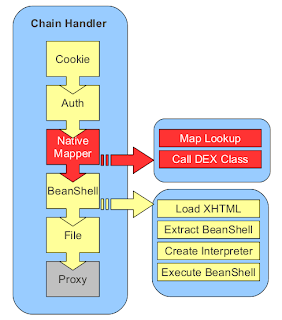
PAW Standard Handler Chain

I’ll briefly recap what handlers are good for.
Handlers form the processing chain on HTTP requests. Handler are organized in a list that is processed until a handler processing the request is found. If a handler signals that it can handle the request, the handler will process the request and the list of handlers is no longer processed.

In the example we will extend the BasicAuthHandler which handles the basic authentication to protect a web resource (most often a directory).
The handler will be extended in the way, that it will only request credentials if pages are called from external, localhost request should not need to authenticate.

The standard BasicAuthHandler does not provide this functionality. It always asks for credentials, regardless where the request came from.

Since PAW 0.96 there is a new handler called CallBshHandler which accepts a BeanShell file to act as a handler.

The BeanShell file has the following base structure:

/*
    Variables: server, prefix, handler
*/
init() {

}

/*
    Variables: server, prefix, handler, request
*/
respond() {

}

There are the two methods init() and respond(). Both methods return true on success and false on failure. The init() method receives the server, prefix and handler variables. The server and prefix variables are needed to get configuration parameters specified inside the conf/handler.xml file. The handler variable holds a reference to the calling CallBshHandler  instance. This instance is needed to persist settings (between init() and response()) methods. This is necessary, because init() and response() are not called within the same BeanShell interpreter instance (to make the handler thread safe). To persists objects within the handler, the methods save() and load() are provided. The example will show how these methods are used.

Extending the current BasicAuthHandler will be done in three steps:
  1. Disable the BasicAuthHandler
  2. Create the new handler
  3. Configure the new  handler

Disable the BasicAuthHandler

To disabling the current BasicAuthHandler, find the following handler in the conf/handler.xml file and change the  status property to inactive
<handler status="inactive">
    <name>Basic Auth Handler</name>
   …
</hadler>

Create the New Handler

We will now build a handler that calls the standard BasicAuthHandler only on external requests. Local requests, which have the IP number 127.0.0.1 or ::1 will not be processed and so no credentials will be requested.

To build the new handler, create a directory handler inside the PAW installation folder (paw/handler). Inside that folder create a file called authHandler.bsh with the following content:

import org.paw.handler.BasicAuthHandler;

LOCALHOST = "127.0.0.1";
LOCALHOST_V6 = "::1";

/*
    Variables: server, prefix, handler
*/
init() {
    authHandler = new BasicAuthHandler(); 
    handler.save("authHandler", authHandler);

    return authHandler.init(server, prefix);

}

/*
    Variables: server, prefix, handler, request
*/
respond() {
    ip = request.sock.getInetAddress().getHostAddress();

    if(ip.equals(LOCALHOST) || ip.equals(LOCALHOST_V6)) {
        return false;
    }

    authHandler = handler.load("authHandler");
    return authHandler.respond(request);
}

The code is straightforward. Inside the init() method the BasicAuthHandler is instantiated. That instance is saved within the calling handler by calling handler.save().
The last line of the init() method returns the result of the call to init() of the instantiated BasicAuthHandler class.

If the init() method returns true, the handler will be added to the list of handlers and the respond()method will be called on each request.

When the respond() method is called it first gets the requestor’s IP number and assigns it to the variable ip. If the variable contains a localhost IP (127.0.0.1 or ::1) the method returns false, which indicates that the handler will not handle the request.
In that case no credentials are requested and the handler chain is further processed.

If the request is not initiated by a localhost address, the respond() method of the BasicAuthHandler instance is called and the return value of that method is returned.


Configure the New Handler

To configure the new handler, just place the following handler definition below or above the original BasicAuthHandler definition of the conf/hander.xml file:

<handler status="active">
    <name>BeanShell auth handler</name>
    <description>Auth handler that allows local access</description>
    <removable>true</removable>
    <id>bshAuth</id>
    <files/>
    <params>
      <param name="bshAuth.class" value="org.paw.handler.CallBshHandler" />
      <param name="bshAuth.script" value="[PAW_HOME]/handler/authHandler.bsh" />
      <param name="bshAuth.confdir" value="[PAW_HOME]/webconf/auth" />
    </params>
  </handler>

The parameters describe the class (org.paw.handler.CallBshHandler) and script ([PAW_HOME]/handler/authHandler.bsh) to use. The third parameter called confdir is the standard configuration parameter used by the BasicAuthHandler. The BeanShell handler passes this parameter when calling the BasicAuthHander.init() method from its init() method.

Because the new handler calls the standard handler, the Directory Protection settings from within PAW’s web interface also apply to the new handler.

On next startup of the server the new handler should be active. If the startup fails, increase the log level, restart the server and have a look at the log file.

Testing the Handler

To test the handler, I’ve created a directory test within the html folder (html/test). For the at folder, directory protection has been setup using the Directory Protection page of the web interface.
The localhost connection was tested by using ADB’s TCP forward parameter (adb forward tcp:8080 tcp:8080).

When testing with an IP number, authentication is required:

$ telnet 192.168.178.79 8080
Trying 192.168.178.79...
Connected to 192.168.178.79.
Escape character is '^]'.
GET /test/ HTTP/1.0

HTTP/1.0 401 Unauthorized
WWW-Authenticate: basic realm="Bsh Auth Test"
Date: Sun, 06 Dec 2015 09:05:38 GMT
Server: PAW Server 0.97-android (Brazil/2.0)
Connection: close
Content-Length: 34
Content-Type: text/html

Missing http header: AuthorizationConnection closed by foreign host.

On a localhost request, no authentication is needed and the directory listing is displayed:

$ telnet localhost 8080
Trying 127.0.0.1...
Connected to localhost.
Escape character is '^]'.
GET /test/ HTTP/1.0

HTTP/1.0 200 OK
Set-Cookie: cookie=7th5kto9f4nrf1a5r8pdse; PATH=/
Date: Sun, 06 Dec 2015 09:08:32 GMT
Server: PAW Server 0.97-android (Brazil/2.0)
Connection: close
Content-Length: 99
Content-Type: text/html

<title>Directory Listing</title>
<h1>Directory Listing</h1>
<a href=..><b>parent directory</b></a>
Connection closed by foreign host.

Wednesday, November 25, 2015

WSMirror - Web Screen Mirror


WSMirror is a small app that mirrors the device screen and displays it within a web browser.
This can be handy for presentations or talks to present the device screen to a larger audience. The app uses the MediaProjection API available since Android Lollipop (5.x). So the app will only work on Devices running Lollipop or higher.
Due to the use of the MideaProjection API no root is required.


After pressing the start button a URL will be displayed. This URL can be inserted into the address bar of a mordern browser (WebSockets are required). The page will display the mirrored screen. Multiple connections are possible and device rotation is supported.


If the screen refresh is too slow, scaling and quality can be adjusted to make the mirroring more responsive.
To stop WSMirror, just press the stop button.

WSMirror is available on Google Play.


Saturday, October 3, 2015

PAW - New Tags

Since PAW Server 0.96 BeanShell tag handling in XHTML files has been improved. In addition PHP like tags are now supported.
In older PAW versions it was a bit cumbersome to write XHTML pages because BeanSHell and HTML could not be mixed. The following code would not have worked:

<bsh>if(i > 0) {</bsh>
<h3>TEST</h3>
<bsh>}</bsh>

This code now works in the new PAW version, because PAW does no longer execute BeanShell blocks separately but does build  complete BeanShell script representing the page that is executed as a whole.

The old tags <bsh> ... </bsh> still do work, but in addition PHP like <?bsh ... ?> tags are available.
Here is a short example:

<?bsh if(i > 0) { ?>
<h3>TEST</h3>
<?bsh } ?>

To make it easier to output BeanShell variables inside HTML code easier the short print tag <?= ... ?>  is now available:

<?bsh i = 7; { ?>
<b>Value of i = </b> <?=i ?>
<?bsh } ?>

Debugging

Sometimes BeanShell error output in XHTML pages might be hard to read and it sometimes makes development more complicated than it should be.

A BeanShell error output that is visible inside the HTML source looks like this:

<!--
BeanShell Error:

bsh.EvalError: Sourced file: inline evaluation of: ``$$.print("<html>\n<body>\n"); import de.fun2code.android.pawserver.AndroidInterf . . . '' : Attempt to resolve method: getProximity() on undefined variable or class name: sensorListener : at Line: 6 : in file: inline evaluation of: ``$$.print("<html>\n<body>\n"); import de.fun2code.android.pawserver.AndroidInterf . . . '' : sensorListener .getProximity ( ) 

-->

Now that the whole page is executed as one entity there is the possibility to show the generated code inside the HTML page source when an error occurred.
By default this feature is disabled (not everyone should see your code), but while developing it's a good idea to turn it on.

To enable the enhanced debug output, change the the value of the bsh.debug property inside the paw/con/handler.xml from false to true and restart the server.

<param name="bsh.debug" value="true" />

The above sample error message is now enhanced with the generated BeanShell code.

<!--
BeanShell Error:

bsh.EvalError: Sourced file: inline evaluation of: ``$$.print("<html>\n<body>\n"); import de.fun2code.android.pawserver.AndroidInterf . . . '' : Attempt to resolve method: getProximity() on undefined variable or class name: sensorListener : at Line: 6 : in file: inline evaluation of: ``$$.print("<html>\n<body>\n"); import de.fun2code.android.pawserver.AndroidInterf . . . '' : sensorListener .getProximity ( ) 

-->

<!--
Generated BeanShell Code:

  1    $$.print("<html>\n<body>\n");
  2    // Imports
  3    import de.fun2code.android.pawserver.AndroidInterface;
  4    import android.content.Context;
  5    import android.hardware.Sensor;
  6    sensorListener = AndroidInterface.getSensorListener();
* 7    proximity = sensorListene.getProximity();

-->

If possible the erroneous line is marked with an asterisk (*). This should make finding the error much easier.

Tuesday, September 22, 2015

Digest Authentication

Although the PAW Server configuration does not include Digest Authentication by default, this authentication scheme is available and can be configured inside the paw/conf/handler.xml configuration file.

To enable Digest Authentication, add the following lines to  the paw/conf/handler.xml file just after the opening <handlers> tag:

  <handler status="active">
    <name>Digest Handler</name>
    <description>Digest authentication handler.</description>
    <removable>true</removable>
    <id>authDigest</id>
    <files/>
    <params>
      <param name="authDigest.class" value="sunlabs.brazil.handler.DigestAuthHandler" />
      <param name="authDigest.prefix" value="/" />
      <param name="authDigest.realm" value="Protected" />
      <param name="authDigest.credentials" value="[PAW_HOME]/webconf/auth/digest.conf" />
    </params>
  </handler>

This configuration protects the whole web site, if you would only like to protect a single directory, you can change the prefix parameter.

Now create a file called paw/webconf/auth/digest.conf with the following content:

#---------------------------------------------------------
# Digest Authenticatin configuration
#---------------------------------------------------------
# Format:
# username=plain password
#
# Instead of the plain password, HA1 can be used:
# md5(user:realm:pass)
#
# username=HA1
#---------------------------------------------------------
user=test

The sample user is called user, with the password test.
It is recommended to build the HA1 hash for security reasons.

For the changes to take effect, restart the server.

Saturday, August 15, 2015

Advanced PAW Server - Pre-Release 1

PAW's documentation is far from perfect and I often get questions from users how things work. To make life for users and me easier I decided to write an eBook how to use PAW's API to write dynamic web applications.

This is the first pre-release of Advanced PAW Server.


It is not complete and surely contains a lot of bugs and typos.
Nevertheless I hope it is already useful at this point.

Have fun :)

The eBook is available in PDF format.

Here is the download Link:
https://goo.gl/6BDgno

Wednesday, December 10, 2014

PAW - Using JavaMail

I got a question (hello Guy) regarding sending mails via PAW Server.
In this use case an Arduio Uno sends HTTP request to PAW which then sends a mail via SMTP to a mail relay.

 ---------                 ---------------
| Arduino | ---- HTTP --> | Android / PAW | ---- SMTP --> 
 ---------                 ---------------
So far for the setup seems quite easy.
Unfortunately (as so often) this is not as easy as it seems. The Android API does not include means to send mails via SMTP. Something like JavaMail is not included.
This post will show how to use JavaMail together with PAW to implement the above use case.
You'll find a Short and a Long Version. The Short Version contains only the necessary downloads and scripts to get things running.
For those interested in technical detail there is the Long Version which will explain things in more detail.
There is a pitfall when using Gmail. So in case you are a Gmail user, please read Using Gmail in addition.

Short Version

Download this paw_javamail.zip ZIP file from Google Drive and extract it to your PAW installation folder (normally /sdcard/paw) inside the webconf/dex folder.
The ZIP file contains the JavaMail libraries from the javamail-android project together with an utility library to make sending of mails via PAW easier.

After a restart of PAW Server everything should be setup to send mails from the BeanShell console.

Here is a test script:

useDexClasses();

import de.fun2code.paw.mail.*;

// Construct a mail class that holds all the server settings
mail = new Mail("smtp.gmail.com", 587, "user@gmail.com", 
      "password", Mail.TransportType.TLS);

// Send an SMTP message including attachments
mail.sendSmtp("sender@gmail.com", "recipient@whatever.com",
              "Test subject", "Test message ...", new File[] { new File("/sdcard/image1.jpg"), new File("/sdcard/image2.jpg") });


First we create a mail object that holds the SMTP server, authentication and connection settings.
The connection are in this example set to TLS, but could also be SSL or PLAIN.
In this case Gmail ist used but could be any other provider.

The sendSmtp method implements the sending of the mail message and takes sender, recipient, subject, body message and an attachment File array as parameter.
If no attachments should be added, just pass null as parameter.

In case of Gmail you'll have to take additional steps to get this working, please read Using Gmail below.

Using Gmail

When using Gmail, the following Exception is likely to occur:

javax.mail.AuthenticationFailedException

The reason for this is that Google does not allow third party apps to access Gmail by default.
In my case I got a mail from Google which included the following link to lower my Gmail security:

https://www.google.com/settings/security/lesssecureapps

After lowering security, everything worked as expected.

Long Version

Let's get a bit into detail ...

Why is it necessary to use the files form the javamail-android project and why is a separate utility class needed for sending mails?

My first take on JavaMail was to download the JavaMail JAR file from the official Oracle web site and use it within PAW. For JAR files to work on Android devices they have to be converted into Dalvic Executable (DEXed) format. For more info about DEXing, you can have a look at the following blog post: PAW - Dynamic DEX Class Loading

Not all classes can bed converted into DEX format, some just don't work. That's the case with the Activation classes needed by JavaMail. That's why the official libraries cannot be used.
Here comes the javamail-android project to the rescue which provides DEXable JavaMail libraries.
These are the library included inside the  paw_javamail.zip ZIP file.

Inside the ZIP file as well comes a  DEXed version of the de.fun2code.paw.mail.Mail class which implements the sending of SMTP messages. Why do we need that class, couldn't we have just put all that code insde a BeanShell script?

In principle yes, but BeanShell on Android does not have the possibility to compile all (inner) classes. That's just not working for the authentication part of JavaMail. So that's why there is this precompiled additional class, which in addition also has the advantage of being faster than the equivalent BeanShell code.

Below is the complete de.fun2code.paw.mail.Mail class which uses plain JavaMail.


package de.fun2code.paw.mail;

import java.io.File;
import java.util.Properties;

import javax.activation.DataHandler;
import javax.activation.DataSource;
import javax.activation.FileDataSource;
import javax.mail.Message;
import javax.mail.MessagingException;
import javax.mail.Multipart;
import javax.mail.PasswordAuthentication;
import javax.mail.Session;
import javax.mail.Transport;
import javax.mail.internet.InternetAddress;
import javax.mail.internet.MimeBodyPart;
import javax.mail.internet.MimeMessage;
import javax.mail.internet.MimeMultipart;

/**
 * Class that contains methods to send SMTP messages via JavaMail
 */
public class Mail {
 public static enum TransportType  {
  PLAIN, TLS, SSL
 };
 
 private TransportType transport;
 private String smtpServer;
 private int smtpPort;
 private String username;
 private String password;
 
 /**
  * The constructor takes the basic connection parameters
  * 
  * @param smtpServer  SMTP server name
  * @param smtpPort  SMTP server name
  * @param username  authentication user name
  * @param password  authentication password
  * @param transport  transport type: PLAIN, TLS or SSL
  */
 public Mail(String smtpServer, int smtpPort, String username,
   String password, TransportType transport) {
  this.smtpServer = smtpServer;
  this.smtpPort = smtpPort;
  this.username = username;
  this.password = password;
  this.transport = transport;
 }

 /**
  * Sends a SMTP mail message
  * 
  * @param from     sender name
  * @param to     recipient name
  * @param subject    mail subject
  * @param messageText   body text
  * @param attachments   attachments to attach
  * @throws MessagingException
  */
 public void sendSmtp(String from, String to,
   String subject, String messageText, File[] attachments) throws MessagingException {

  String strPort = String.valueOf(smtpPort);
  
  // Fill basic properties
  Properties props = new Properties();
  props.put("mail.smtp.host", smtpServer);
  props.put("mail.smtp.auth", "true");
  props.put("mail.smtp.port", strPort);
  
  // Add connection properties
  switch(transport) {
   case TLS:
    props.put("mail.smtp.starttls.enable", "true");
    break;
   case SSL:
    System.out.println("Using SSL ...");
    props.put("mail.smtp.socketFactory.port", strPort);
    props.put("mail.smtp.socketFactory.class",
      "javax.net.ssl.SSLSocketFactory");
    break;
   case PLAIN:
    break;
  }
  

  // Create the session
  Session session = Session.getInstance(props,
    new javax.mail.Authenticator() {
     protected PasswordAuthentication getPasswordAuthentication() {
      return new PasswordAuthentication(username, password);
     }
    });

  try {
   // Create MimeMessage
   Message message = new MimeMessage(session);

   // Set from header
   message.setFrom(new InternetAddress(from));

   // Set to header
   message.setRecipients(Message.RecipientType.TO,
     InternetAddress.parse(to));

   // Add subject
   message.setSubject(subject);
   
   // Add attachments if available
   if(attachments != null) {
    Multipart multipart = new MimeMultipart();
    
    // The body message
    MimeBodyPart textPart = new MimeBodyPart();
    textPart.setText(messageText, "utf-8");
    multipart.addBodyPart(textPart);
    
    for(File file : attachments) {
     MimeBodyPart messageBodyPart = new MimeBodyPart();
           DataSource source = new FileDataSource(file.getAbsoluteFile());
           messageBodyPart.setDataHandler(new DataHandler(source));
           messageBodyPart.setFileName(file.getName());
           multipart.addBodyPart(messageBodyPart);
    }
    
    message.setContent(multipart);
   }
   else {
    // Add the body message
    message.setText(messageText);
   }

   // Send the message
   Transport.send(message);

  } catch(MessagingException e) {
   throw e;
  }
  
 }

}


Saturday, November 8, 2014

Microbes - Fast Paced Casual Game

This is a guest post by Michaela presenting her first game Microbes available now on Google Play.

The original post in German can be found here ...


Microbes Promo Video


Yeah, it is finished :)

moreGainE1976's first Android Game is released to play!
Now you can visit the small and cute Microbes on their garbage dump!

Link to Google Play Store: http://goo.gl/Hr1PSX

The Main Characters


This small and green scaredy cat is the smallest Microbe, that is allowed to play on the garbage dump. Its only job is to be afraid and to be eaten.


The next bigger one is the yellow Microbe with the funny snouts as ears. It eats smaller green Microbes and prefers many at once. Nevertheless, it must have to worry if the larger Microbe is near:


These lovely purple lady is the third Microbe. As harmless as she may strum with her eyes, so greedy she is! No yellow Microbe is safe from her!


The red Microbe is the hungriest of the four. It hits its teeth in the purple ladies, as it was just starving! There is no escape! And when it ate too much, then it bursts!


To clean up the garbage dump, there is from time to time – as a reward – a small poison bottle. Sometimes – but not always! - the shattered poison bottle lets explode some Microbes, too, and so generates extra points.

And yes, the skull is a cross over to the PirateBox :)

Saturday, October 11, 2014

Wear Shell - Exploring Android Wear

Having a LG G Watch for a while I thought that it would be interesting to run code directly on the watch without having to create an APK. Sometimes I just wanted to run some code snippets on the watch and view the result instantly.
Creating a complete project, compiling and deploying the APK on the Wear device is quite time consuming and somewhat annoying.

I tried to write an app to execute BeanShell code directly on the Wear device. This is all experimental and the possibilities are quite limited compared to an regular app, but for an execution of some code snippets that seemed to be a good idea.

The result is Wear Shell, an app that consists of a mobile and a Wear part. The mobile part moves the code for execution to the smart watch, collects the result and passes it to the calling application.

So I hope owners of an Android Wear smart watch have fun with the app and find it as interesting as I did to explore things from the perspective of a watch.

WearShell App


Web Interface

To make tests easier, the app contains a small (PAW based) web server with a web interface. Inside this interface you can type the code inside a text area, press the Execute button and wait for the result to be displayed.

Web Interface with Wear System Information


The web interface also contains a page containing code snippets for you to try out. These snippets include code for database, Bluetooth and system info access and should provide a good starting point for further explorations.

Developers

Developers have the possibility to use the functionality of the app within their own applications by using a Result Intent.

Action: de.fun2code.android.wear.shell.EXEC
Request String Extra: bsh
Response String Extra: result

Just pass the BeanShell code to execute to the bsh parameter and read the result from the resulting Intent.

Links 

Download: WearShell APK
Discussion: XDA Developers

Tuesday, August 26, 2014

PirateBox for Android - Android Wear

Starting with version 0.53 PirateBox for Android supports Android Wear notifications for uploads and shout messages.

Android Wear support is disabled by default but can be enabled inside the PirateBox preferences. There is a new Android Wear section which currently only has one Wear Notification check-box preference.
As soon as this option is ticked upload and shout notifications will be sent to a connect Wear device.

Android Wear Preference

Whenever a new upload or shout has been processed and sent to the Wear device a notification is displayed on the Android device (the phone) to indicate that new notifications have been transferred to the Wear device. If that notification gets dismissed, all notifications on the smart-watch will also be deleted.

Wear Notification on Phone

On the smart-watch notifications are summarized and presented in chronological order (newer first). The following image describes the flow on the Wear device.

Flow on Wear Device

After the messages have been expanded options are available to open the PirateBox app on the phone and in the case of a file upload to open that file on your phone for display.

Thursday, August 7, 2014

PirateBox for Android - I18N

The latest PirateBox for Android version 0.5.2 adds i18n support to the web interface. It is now possible to change the language of the web interface independent of the phone's langue settings.
This post will show how to add your own translations in a few easy steps ...

The language files are stored inside the piratebox/html/i18n* folder. The file names have the following format: i18n_ISO.properties
The ISO part specified the ISO 639-1 code which defines the language. Here is a list of available ISO language codes: Language Codes according to ISO 639-1

To add your own translation copy the English translation i18n_en.properties file and rename it to your desired language. To take French as an example, the file would be named i18n_fr.properties.

It is important to note that the file encoding has to be ISO-8859-1, otherwise you might have issues displaying the characters correctly inside the web interface.

Now you can start editing the file. The file contains key value pairs separated by an equals (=) sign. All you have to do is to translate the right hand side of the euqation.
Here is an example, the original in English on the left and the French translation on the right:
button.thanks=Thanks                                button.thanks=Merci

If all lines have been translated, copy the  new file to the piratebox/html/i18n folder and you are almost done.

To select the new language simply go to the preferences of the PirateBox app and select Web Interface Language. If everything worked well the language should be available for selection.


After a restart of the server the web interface should show the new translation.
Besides English the web interface is already translation into German. If you have made your own translation, you can send it to me** and I'll include it in the next release***.

Have fun and I hope everything is working as it should ...


Base directory: /data/data/de.fun2code.android.piratebox/files/
** Mail: jochen[at]fun2code.de
*** If there are multiple for the same language, I'll pick one...

Saturday, July 19, 2014

PirateBox for Android - Modding

Here are the workshop slides I prepared for the PirateBox Camp #2 in Lille. Because they were not used at the camp I'll post them here, so they are not lost.
The slides show the range of possible modifications to the PirateBox for Android, ranging form simple preference changes to the more advanced use of the Android API.

Here are the slides, more details and download links are available below the presentation.
 
The first slide shows the Basic Settings that can be changed inside the preferences of the PirateBox app.
These basic settings allow to change things like the SSID name, storage directory etc. without deeper knowledge of the PirateBox.

The next slide Content Modifications shows the settings needed to make basic changes to the HTML, CSS and JavaScript files. After ticking the Content to SD option, the app has to be restarted for the change to take effect. After the restart you should find a folder named piratebox on your SD card (or wherever your external storage file system is located).

Inside the piratebox folder you'll find a directory named html which contains all the HTML, CSS and JavaScript files. If you are making changes to files located inside the html directory, make sure that the option Enable Updates is not ticked to prevent the next update of the app to overwrite your changes.
You will also notice that the html directory contains files with the extension xhtml. These files are html files that, in addition to standard HTML, include dynamic content. Dynamic content is covered in the slides that follow.

The next five slide (Dynamic Pages, Using BeanShell, XHTML Example, XHTML Errors and BeanShell DIY) cover the use of dynamic pages by using BeanShell. The slide named BeanShell DIY contains a download link (available below) that offers you the possibility to execute BeanShell code directly on your device.

The last two slides (Using the Android API and Android API DIY) are targeted at developers that already know the Android API. The Adroid API DIY links to a ZIP file (download below) that contains an example that shows the use of the Android API to access the music stored on the Android device. After unzipping the files to the html directory you should have an additional menu entry named Media inside the menu of your PirateBox start page.

If you are interested in how that works you can inspect the xhtml files included inside the ZIP file. But event if you are not into development the sample might be a nice addition to your PirateBox.

Downloads

The files referred to inside the presentation are available on Google Drive:
camp#2/beanshell.zip
camp#2/android_media.zip

Tuesday, July 15, 2014

PirateShare

PirateShare is an app that tries to simplify file upload to a PirateBox by using Android's share functionality.
On the PirateBox Camp #2 we tried the app and it seems to work quite well.
Android Share Dialog (image by #BiblioBox)

PirateShare was inspired by the PirateFox a PirateBox file sharing app for FireFox OS:

http://ruk.ca/content/piratebox-firefox-os-piratefox
https://github.com/reinvented/piratefox

The  PirateShare app is available for download on Google Drive:
http://t.co/j7oiLJdZuT


The app works like this:

  1. Select one or multiple photos from the Gallery or select file(s) inside a file management app
  2. Select PirateShare from share menu
  3. PirateShare checks if connected to a PirateBox by requesting the ncsi.txt file
  4. If connected PirateShare will upload the file(s)
Upload Dialog

Wednesday, May 21, 2014

PirateBox at Google Play

After quite some testing PirateBox for Android is now available at Google Play.
Thanks a lot to all of you for testing. Special thanks goes to Skyworth S8 for testing and sending in lots of screen shots (see gallery below).

The APKs will also be published to Google Drive, so installation will be possible for devices without Goggle Apps.

In case of errors or if you would like to provide feedback, please send a mail to piratebox[at]fun2code.de or leave a comment below.


Links

PirateBox at Google Play
APKs on Google Drive

Saturday, May 17, 2014

PirateBox Reloaded - Episode III

Version 0.4.4 of PirateBox for Android is now available. This post is about the new and noteworthy features of that version.

If tests go well and I have enough feedback I will make PirateBox for Android available at Google Play. So please fill out the questionnaire ... feedback has been very sparse lately.

Droopy Support

The original PirateBox uses Droopy for file upload. PirateBox for Android uses his own mechanism for file uploads. To be compatible Droopy emulation has been introduced. If the Emulate Droopy option is enabled (which it is by default) files can be uploaded by using port 8080.

PirateBox and PirateFox

This makes it possible to use existing file upload tools. For testing the FireFox OS app PirateFox has been used (see image).

In addition to the file upload feature, a number is added to the uploaded file name if the file already exists. In earlier versions files with the same name were silently overwritten.


Info Widget

Info Widget
To make it easier to see if files were uploaded or new messages are available the new version contains a new widget which displays this information.

The counters should update automatically. If that does not work, you can force an update by tapping the widget.

Tasker/Locale Plugin

To make automation easier the latest version contains a Tasker/Locale plugin.
With this plugin it is possible to define tasks to switch the PirateBox on/off automatically.

Tasker
It has to be noted, that there are problems when using WiFi on/off as trigger. This is likely to not work as expected. I hope I'll be able to fix that in upcoming versions.


Status Broadcasts

This might only be interesting for developers but it is now possible to request the status of the PirateBox externally via broadcast. The new Info Widget uses this functionality and might serve as example.

The broadcast action used for the status request is de.fun2code.android.piratebox.broadcast.intent.STATUS_REQUEST and the PirateBox app will respond with a de.fun2code.android.piratebox.broadcast.intent.STATUS_RESULT broadcast which contains the following extras:

SERVER_STATE
  boolean value: true if the server is running, otherwise false

UPLOAD_NUMBER
  int value: number of uploaded files

SHOUT_NUMBER
  int value: number of shout/chat messages

UPLOAD_DIR
  String value: upload directory location

SHOUT_DIR
  String value: shout/chat directory location


That's it for the new version ... looking forward to receiving more feedback :)